
daspacio9/pooledpremiumpcrpipeline2


A snakemake pipeline for multiplex sequencing using the Plasmidsaurus Premium PCR service
Overview
Latest release: v4.0.2, Last update: 2026-09-25
Share link: https://snakemake.github.io/snakemake-workflow-catalog?wf=daspacio9/pooledpremiumpcrpipeline2
Quality control: linting: passed formatting: passed
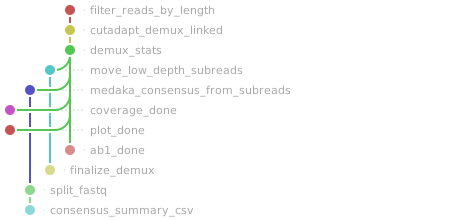
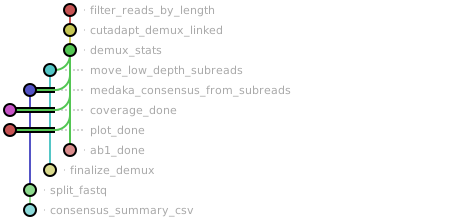
Workflow Rule Graph
This visualization of the workflow’s rule graph was automatically generated using Snakevision
Deployment
Step 1: Install Snakemake and Snakedeploy
Snakemake and Snakedeploy are best installed via the Conda package manager. It is recommended to install conda via Miniforge. Run
conda create -c conda-forge -c bioconda -c nodefaults --name snakemake snakemake snakedeploy
to install both Snakemake and Snakedeploy in an isolated environment. For all following commands ensure that this environment is activated via
conda activate snakemake
For other installation methods, refer to the Snakemake and Snakedeploy documentation.
Step 2: Deploy workflow
With Snakemake and Snakedeploy installed, the workflow can be deployed as follows. First, create an appropriate project working directory on your system and enter it:
mkdir -p path/to/project-workdir
cd path/to/project-workdir
In all following steps, we will assume that you are inside of that directory. Then run
snakedeploy deploy-workflow https://github.com/daspacio9/pooledpremiumpcrpipeline2 . --tag v4.0.2
Snakedeploy will create two folders, workflow and config. The former contains the deployment of the chosen workflow as a Snakemake module, the latter contains configuration files which will be modified in the next step in order to configure the workflow to your needs.
Step 3: Configure workflow
To configure the workflow, adapt config/config.yml to your needs following the instructions below.
Step 4: Run workflow
The deployment method is controlled using the --software-deployment-method (short --sdm) argument.
Snakemake will automatically detect the main Snakefile in the workflow subfolder and execute the workflow module that has been defined by the deployment in step 2.
For further options such as cluster and cloud execution, see the docs.
Step 5: Generate report
After finalizing your data analysis, you can automatically generate an interactive visual HTML report for inspection of results together with parameters and code inside of the browser using
snakemake --report report.zip
Configuration
The following section is imported from the workflow’s config/README.md.
Configuration Overview
The Pooled Premium PCR Pipeline 2 is a Snakemake workflow designed for demultiplexing and consensus sequence generation from pooled barcoded samples submitted to the Plasmidsaurus Premium PCR service. Configuration is managed through two main files:
config.yaml- Main workflow parameters and settingsref/*
The workflow performs the following key steps:
Prepare reference barcode-pairs file from supplied primer and barcode data (when prepare_barcode_reference with –force flag is provided)
Demultiplex pooled sequencing data using barcode pairs
Generate consensus sequences for each barcode group
Produce synthetic AB1 trace files and alignment reports for each barcode group
Generate quality statistics and coverage plots
Configuration Parameters
Main Pipeline Settings (config.yaml)
Parameter |
Type |
Description |
Example |
|---|---|---|---|
min_depth |
integer |
Minimum read depth for consensus generation |
|
input_fastq |
string |
Path to input FASTQ file in |
|
primer_consensus |
string |
FASTA file with primer sequences in |
|
barcode_groups |
string |
CSV file defining barcode groups in |
|
barcodes |
string |
FASTA file with barcode sequences in |
|
filter_size |
integer |
Minimum read length (bp) after adapter trimming |
|
cutadapt_min_overlap |
integer |
Minimum matching bases between read and adapter |
|
cutadapt_error_rate |
float |
Maximum allowed error rate for adapter matching (0-1) |
|
medaka_model |
string |
Medaka consensus polishing model |
|
medaka_spoa_threads |
integer |
Number of parallel threads for consensus generation |
|
debug |
boolean |
Enable debug mode for verbose logging |
|
Input Data Structure
Reference Files (in ref/ folder)
The pipeline requires three reference files for barcode-based demultiplexing:
cole1-primer-consensus.fasta- Consensus sequences for primer setscole1-barcode-groups-48.csv- Mapping of barcodes to sample groupscole1-barcodes-48.fasta- FASTA sequences of all barcodes
For different barcode systems (e.g., non-colE1 plasmids), create a new working directory and prepare different reference files using the prepare_barcode_reference rule.
Sequencing Data (in sequences/ folder)
Place your demultiplexed or pooled FASTQ files (gzipped):
sequences/
├── sample_batch_1.fastq.gz
├── sample_batch_2.fastq.gz
└── ...
Advanced Parameters
Parameter |
Type |
Default |
Notes |
|---|---|---|---|
cutadapt_min_overlap |
integer |
|
Affects barcode matching stringency. Lower values are more permissive. |
cutadapt_error_rate |
float |
|
Allows ~1.2 mismatches in 6bp stretch, ~3 mismatches in 15bp |
filter_size |
integer |
|
Filters out adapter dimers and very short reads |
medaka_model |
string |
|
Must match your sequencing device; this is optimized for oxford nanopore r1041 |
medaka_spoa_threads |
integer |
|
Adjust based on available CPU resources |
downsample_reads |
integer |
|
Maximum number of reads to use per barcode group. Set to 0 to disable downsampling. |
Output Structure
The workflow generates outputs in the following directory structure:
├── ab1/                           # Synthetic AB1 trace files (ABIF format, max 5kb chunks)
│   ├── group_1_0.ab1
│   └── ...
├── consensus/                     # Consensus sequences
│   ├── group_1_consensus.fastq
│   └── ...
├── aln/                           # Alignment files
│   └── *.bam
├── consensus_split/               # Split consensus sequences by length
├── demux/                         # Demultiplexed reads
├── logs/                          # Processing logs
├── report/                        # Analysis reports
│   ├── coverage.pdf
│   ├── mismatch_freq.pdf
│   └── ...
├── sequences/                     # Processed sequences
├── demux_stats.csv                # Summary statistics table
└── consensus_summary.csv          # Consensus sequence metadata
Key Output Files
File |
Description |
Usage |
|---|---|---|
*.ab1 |
Synthetic chromatogram trace files |
Open in Benchling, SnapGene, APE for alignment and confidence checking |
group_*_consensus.fastq |
Consensus sequences in FASTQ format |
Alignment to reference plasmid |
consensus_summary.csv |
Metadata for all consensus sequences |
Summary of results and confidence metrics |
coverage.pdf |
Coverage depth plot |
Visualize read mapping across consensus |
mismatch_freq.pdf |
Mismatch frequency plot |
Identify problematic regions |
demux_stats.csv |
Barcode demultiplexing statistics |
Track read counts per barcode group |
Usage Examples
Running the Workflow
First, prepare the reference files (if using a new barcode system):
snakemake -s ../workflow/Snakefile -j 4 prepare_barcode_reference --use-conda --force
Then run the main demultiplexing and consensus workflow:
# Dry run to check for errors
snakemake -s ../workflow/Snakefile -j 4 --use-conda -np

# Execute the workflow
snakemake -s ../workflow/Snakefile -j 4 --use-conda -p
Reusing a Working Directory
To restart with new input data while keeping the directory structure:
snakemake -s ../workflow/Snakefile -j 4 --use-conda clean
This archives the previous run with a timestamp and prepares for a new run.
Reference Files Preparation
To use different barcode systems or primer sets, you can create custom reference files:
Create a new working directory:
mkdir working_directory_custom_locus
cd working_directory_custom_locus
Place your reference files in
ref/folder and updateconfig.yamlwith new filenamesRun the prepare_barcode_reference step with your new files
See the main README.md for more detailed workflow information.
Workflow parameters
The following table is automatically parsed from the workflow’s config.schema.y(a)ml file.
Parameter |
Type |
Description |
Required |
Default |
|---|---|---|---|---|
min_depth |
number |
minimum read depth threshold for consensus generation |
yes |
|
primer_consensus |
string |
path to primer consensus FASTA file (placed in ref/) |
yes |
|
barcode_groups |
string |
path to barcode groups CSV file (placed in ref/) |
yes |
|
barcodes |
string |
path to barcodes FASTA file (placed in ref/) |
yes |
|
input_fastq |
string |
path to input FASTQ file for processing (placed in sequences/) |
yes |
|
medaka_spoa_threads |
number |
number of parallel threads for medaka consensus generation |
yes |
|
debug |
boolean |
enable debug mode |
yes |
|
filter-size |
number |
minimum read length filter (in bp) to remove short reads and adapter dimers |
yes |
|
downsample_reads |
number |
number of reads to downsample each demuxed sample to before consensus generation |
yes |
|
cutadapt_min_overlap |
number |
minimum overlap parameter for cutadapt adapter matching (in bp) |
yes |
|
cutadapt_error_rate |
number |
maximum allowed error rate for cutadapt adapter matching (0-1) |
yes |
|
medaka_model |
string |
medaka consensus polishing model identifier |
yes |